Photoshop设计制作华丽的古典金色浮雕花纹
平面设计 发布日期:2026/3/5 浏览次数:1
正在浏览:Photoshop设计制作华丽的古典金色浮雕花纹
花纹素材有很多,需要的时候,我们可以用图层样式等增加颜色、质感、纹理,就可以得到相当不错的效果,可更好装饰画面。
最终效果

1、新建一个800 * 800像素的文件,选择渐变工具,颜色设置为红色至暗红色如图1,然后由中心向边角拉出图2所示的径向渐变作为背景。
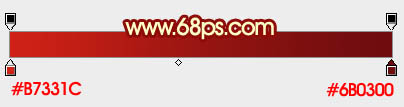
<图1>

<图2>
2、先保存图3所示的花纹素材,然后用PS打开,再用移动工具拖到新建的文档里面,解锁后调整好位置,如图4。这一步也可以直接用画笔刷上自己喜欢的花纹笔刷。

<图3>

<图4>
3、锁定花纹图层像素区域后,选择渐变工具,颜色设置如图5,然后由底部向上拉出图6所示的线性渐变。
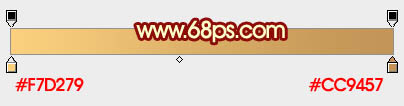
<图5>

<图6>
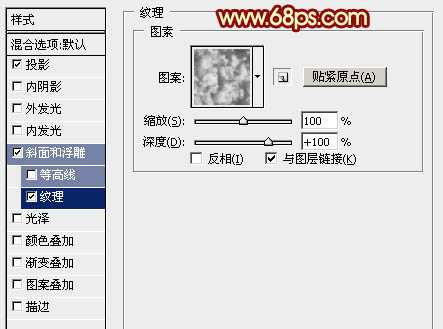
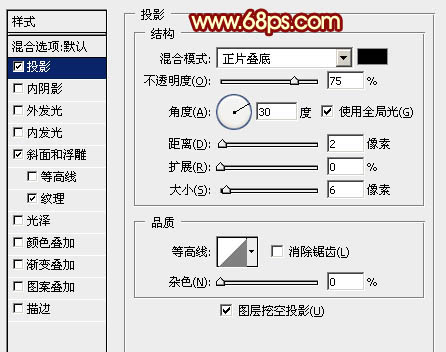
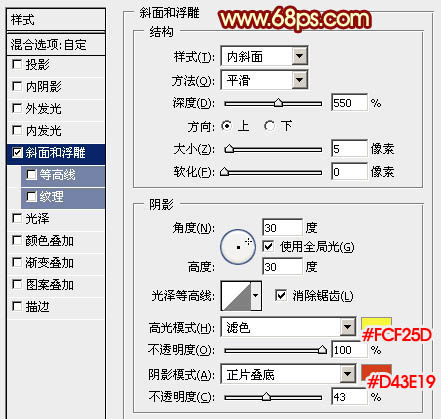
4、双击图层面板,花纹缩略图调出图层样式,分别设置:斜面和浮雕、纹理、投影,参数及效果如下图。
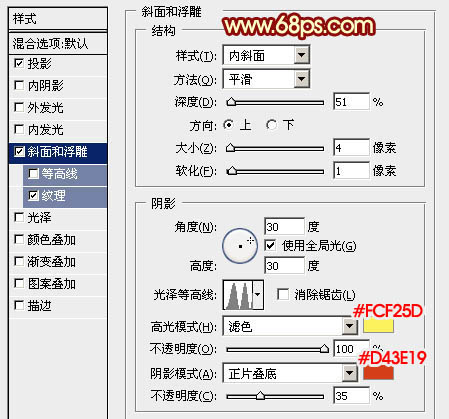
<图7>
<图8>
<图9>

<图10>
5、按Ctrl + J 把当前图层复制一层,然后修改一下花纹副本的图层样式,去掉投影及纹理,修改一下斜面和浮雕的数值,参数设置如图11,确定后把填充改为:0%,效果如图12。
<图11>

<图12>
6、把原花纹图层复制一层,按Ctrl + Shift + ] 置顶,在图层面板缩略图的蓝色区域右键,选择“清除图层样式”,如下图。

<图13>
7、把混合模式改为“颜色减淡”,按住Alt键添加图层蒙版,用白色画笔把需要增加亮度的部分擦出来,效果如下图。

<图14>
最后调整一下细节,完成最终效果。

最终效果
1、新建一个800 * 800像素的文件,选择渐变工具,颜色设置为红色至暗红色如图1,然后由中心向边角拉出图2所示的径向渐变作为背景。
<图1>
<图2>
2、先保存图3所示的花纹素材,然后用PS打开,再用移动工具拖到新建的文档里面,解锁后调整好位置,如图4。这一步也可以直接用画笔刷上自己喜欢的花纹笔刷。
<图3>
<图4>
3、锁定花纹图层像素区域后,选择渐变工具,颜色设置如图5,然后由底部向上拉出图6所示的线性渐变。
<图5>
<图6>
4、双击图层面板,花纹缩略图调出图层样式,分别设置:斜面和浮雕、纹理、投影,参数及效果如下图。
<图7>
<图8>
<图9>
<图10>
5、按Ctrl + J 把当前图层复制一层,然后修改一下花纹副本的图层样式,去掉投影及纹理,修改一下斜面和浮雕的数值,参数设置如图11,确定后把填充改为:0%,效果如图12。
<图11>
<图12>
6、把原花纹图层复制一层,按Ctrl + Shift + ] 置顶,在图层面板缩略图的蓝色区域右键,选择“清除图层样式”,如下图。
<图13>
7、把混合模式改为“颜色减淡”,按住Alt键添加图层蒙版,用白色画笔把需要增加亮度的部分擦出来,效果如下图。
<图14>
最后调整一下细节,完成最终效果。